2019: Week 10 Solution
Our full solution can be viewed below and can be downloaded here.
Probably the biggest challenge of this week’s Preppin’ Data is trying to figure out how to correctly join the Mailing List 2018 data with the Unsubscribed List data.
LOWER(
LEFT([first_name], 1)
+
[last_name]
)
Removing spaces and punctuation from this newly created [Join Field] (as some surnames have hyphens or spaces) means our Unsubscribed List is prepped to join. However, things aren’t so simple back on the Mailing List side.
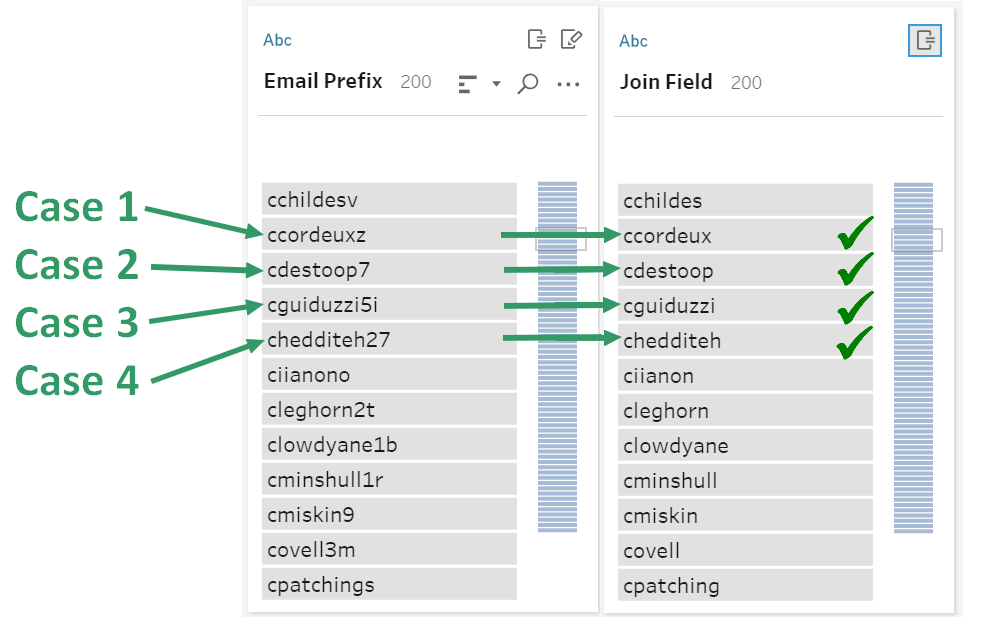
However, after each user’s last name in the email prefix there appears to be one or two random characters. This really messes up what could have been a simple join. However, careful inspection reveals there are only four types of random character combinations:
Firstly, we remove the right-most character from each [Email Prefix] to create our [Join Field] using the following formula.
LEFT(
[Email Prefix],
LEN([Email Prefix]) - 1
)
This means any [Email Prefix] with case 1 or 2 is ready. Any [Email Prefix] with case 3 or 4 now simply has a single extra number that needs removing.
To remove these numbers without messing up the already prepared email prefixes, we can simply use the “Clean > Remove Numbers” option on our [Join Field].
Finally, we can now join our Unsubscribed List data to our Mailing List data on [Join Field] = [Join Field] using either a right/left outer join (right if your Mailing List is on the right, and vice versa if it’s on the left) or a full-outer join. Either should work as all values in the Unsubscribed List will match to a value in the Mailing List but we want to keep all values in the Mailing List regardless of whether they match or not.
At any point after or before this we can simply join the Customer Lifetime Value date with the Mailing List 2018 on [Email] = [Email]. No tricks here!
IF ISNULL([Unsubscribe Date])
THEN "Subscribed"
ELSEIF [Unsubscribe Date] < [Sign-up Date]
THEN "Resubscribed"
ELSE "Unsubscribed"
END
If there’s no [Unsubscribe Date] then the email must still be subscribed. If there is an [Unsubscribe Date] but it’s before the [Sign-up Date] then the email must have re-subscribed after unsubscribing. Anyone else not caught by the above two conditions must still be unsubscribed.
Firstly, I’ve created a calculated field called [Months before Unsubscription]. This contains the following formula:
IF [Status] = "Unsubscribed"
THEN DATEDIFF('month',[Sign-up Date],[Unsubscribe Date])
ELSE NULL
END
If a user is unsubscribed then calculate the difference in months between [Sign-up Date] and [Unsubscribe Date]. If they’re not unsubscribed then just set their value to NULL. Now we need to group these values to get [Months before Unsubscription Group]. This can be done with this second formula:
IF ISNULL([Months before Unsubscribed])
THEN ""
ELSEIF [Months before Unsubscribed] < 3
THEN "0-3"
ELSEIF [Months before Unsubscribed] < 6
THEN "3-6"
ELSEIF [Months before Unsubscribed] < 12
THEN "6-12"
ELSEIF [Months before Unsubscribed] < 24
THEN "12-24"
ELSE "24+"
END
Essentially, it’s just a long IF-ELSE statement where we define our month groupings.
You can create branching paths from a single tool by selecting the plus arrow on your source tool and simply adding the tool required for the first part of each branch. If you want to add a Step tool as any branch other than your first one then you’ll notice the “Add Step” has been replaced by “Insert Step” and “Add Branch”. Add Branch will add a new branch starting with a Step tool, whist Insert Step will add a Step tool that becomes the new source for any existing branches.
To get our summarised data all we need to do is add an Aggregate which groups by:
This is because for each combination of our four grouping fields we want to know the total sales for each type of soap as well as how many email addresses make up these sales.
We can then add a Output tool to the end of this.
There’re then a few ways to filter out data but in this case the quickest is probably simply clicking on the “Unsubscribed” value under [Status] in the Profile Pane and selecting 'Exclude'. This get’s rid of any row with an unsubscribed email address.
Using this method generates a formula on which to filter your data on. You should see in your Changes section, a new Filter action. Right-clicking on this and selecting Edit lets you inspect and edit the generated formula.
After removing any unnecessary remaining fields, we can then add an Output tool to the end of this step too.
 |
| The full solution workflow. |
Figuring out the Join Logic
Probably the biggest challenge of this week’s Preppin’ Data is trying to figure out how to correctly join the Mailing List 2018 data with the Unsubscribed List data.Prepping the Unsubscribed List
On visual inspection we can see that each [Email] in the Mailing List begins with each person’s first name initial and their full surname. This can be easily recreated in the Unsubscribed List using the following calculated field.LOWER(
LEFT([first_name], 1)
+
[last_name]
)
Removing spaces and punctuation from this newly created [Join Field] (as some surnames have hyphens or spaces) means our Unsubscribed List is prepped to join. However, things aren’t so simple back on the Mailing List side.
Prepping the Mailing List 2018
We can start by using a custom split on [email] to “Split off First 1 fields” using ‘@’ as a separator. This will give us the [Email Prefix] of each email address. |
| Getting the email prefix. |
- 1 letter.
- 1 number.
- 1 number and then 1 letter.
- 2 numbers.
 |
| Examples of the four cases. |
All four cases can actually be cleaned up in just two steps and without any RegEx.
Firstly, we remove the right-most character from each [Email Prefix] to create our [Join Field] using the following formula.
LEFT(
[Email Prefix],
LEN([Email Prefix]) - 1
)
This means any [Email Prefix] with case 1 or 2 is ready. Any [Email Prefix] with case 3 or 4 now simply has a single extra number that needs removing.
 |
| Each case after removing a character. |
 |
| Each case after removing the remaining numbers. |
 |
| Details of the join. |
Checking Status
Now we have all our unsubscription dates connected to all relevant customers we can handle this logic with a simple IF calculation:IF ISNULL([Unsubscribe Date])
THEN "Subscribed"
ELSEIF [Unsubscribe Date] < [Sign-up Date]
THEN "Resubscribed"
ELSE "Unsubscribed"
END
If there’s no [Unsubscribe Date] then the email must still be subscribed. If there is an [Unsubscribe Date] but it’s before the [Sign-up Date] then the email must have re-subscribed after unsubscribing. Anyone else not caught by the above two conditions must still be unsubscribed.
Calculating Unsubscription Groups
To get our groups for how long users were subscribed before unsubscribing we can create a single calculated field. However, this becomes difficult to follow so I’ve broken up the logic over two steps.Firstly, I’ve created a calculated field called [Months before Unsubscription]. This contains the following formula:
IF [Status] = "Unsubscribed"
THEN DATEDIFF('month',[Sign-up Date],[Unsubscribe Date])
ELSE NULL
END
If a user is unsubscribed then calculate the difference in months between [Sign-up Date] and [Unsubscribe Date]. If they’re not unsubscribed then just set their value to NULL. Now we need to group these values to get [Months before Unsubscription Group]. This can be done with this second formula:
IF ISNULL([Months before Unsubscribed])
THEN ""
ELSEIF [Months before Unsubscribed] < 3
THEN "0-3"
ELSEIF [Months before Unsubscribed] < 6
THEN "3-6"
ELSEIF [Months before Unsubscribed] < 12
THEN "6-12"
ELSEIF [Months before Unsubscribed] < 24
THEN "12-24"
ELSE "24+"
END
Essentially, it’s just a long IF-ELSE statement where we define our month groupings.
Creating the Outputs
Once we’ve joined all our data together and calculated both the [Status] and [Months before Unsubscribed Group] grouping we’re ready to create both our outputs. Each can be accomplished with a single tool. These two outputs require distinctly different data structures however, so they need to branch in different directions.You can create branching paths from a single tool by selecting the plus arrow on your source tool and simply adding the tool required for the first part of each branch. If you want to add a Step tool as any branch other than your first one then you’ll notice the “Add Step” has been replaced by “Insert Step” and “Add Branch”. Add Branch will add a new branch starting with a Step tool, whist Insert Step will add a Step tool that becomes the new source for any existing branches.
 |
| Demo of creating branches. |
Creating the Summary Output
To get our summarised data all we need to do is add an Aggregate which groups by:- [Months before Unsubscribed Group],
- [Status],
- [Interested in Liquid Soap],
- [Interested in Soap Bars].
- Sum the [Bar Sales to Date],
- Sum the [Liquid Sales to Date], and
- Count the [email] field.
This is because for each combination of our four grouping fields we want to know the total sales for each type of soap as well as how many email addresses make up these sales.
 |
| Details of the aggregation. |
Creating the Updated Mailing List Output
To get our updated mailing list all we need to do is filter out anyone with a [Status] of unsubscribed. To do with we can start by adding a Step tool (or Insert Branch if you’re doing this after your summary output). This needs to be done on a separate branch from your summary output otherwise your summary output will be missing all the data from unsubscribed emails.There’re then a few ways to filter out data but in this case the quickest is probably simply clicking on the “Unsubscribed” value under [Status] in the Profile Pane and selecting 'Exclude'. This get’s rid of any row with an unsubscribed email address.
 |
| Excluding the unsubscribed emails. |
 |
| Inspecting the generated formula. |


