2021: Week 5 - Solution
Solutions by Jenny Martin & Jonathan Allenby and you can download the full workflows here.
Solution A : No LODs
Step 1 - Getting the current Account Managers and IDs
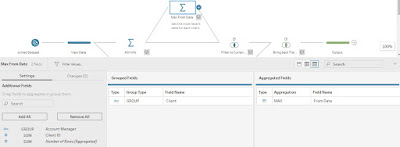
In order to avoid LODs and table calculations we're going to make use of the Aggregate and Join steps in order to summarize and update our data. To start with we're going to ignore the contact and training information and just look at the client specific information.
Use an Aggregate step to group by Client, Client ID, Account Manager, and From Date.
Step 2 - Aggregate the Training and Contact information
Next we're going to de-duplicate our contact and training information using another Aggregate step.
Group on Training, Contact Email, Contact Name, and Client to get our clean list of attendees. You should have 13,538 rows remaining after this aggregate, so not many get removed.
Step 3 - Add in the Account Managers and Client IDs
Finally, we can complete the de-duplication and updating of our attendee data by combining the aggregated contact details with the updated client details.
Use a join step between the Training information Aggregate and the updated Client details join. Use Client = Client to join the two datasets together and then remove the duplicated "Client-1" field.
Solution B : LODs
Step 1 - Get the most recent date per Client
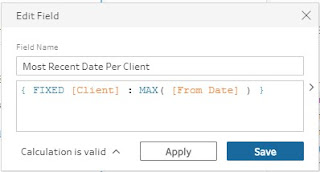
Most of the LODs we're going to use revolve around knowing whether a row holds the most up-date information for a client. To get this information, our first LOD is as follows:
[Most Recent Date Per Client] | { FIXED [Client] : MAX( [From Date] ) }
[Most Recent Date Per Client] | { FIXED [Client] : MAX( [From Date] ) }
Step 2 - Replace outdated Client IDs and Account Managers
We're now going to create two new fields. This will contain the Account Manager and Client ID if the From Date for that row matches the Most Recent Date Per Client. If it doesn't match, then it'll contain NULL.
[New IDs Only] |
THEN [Client ID]
ELSE NULL
END
[New Account Managers Only] |
IF [Most Recent Date Per Client] = [From Date]
THEN [Account Manager]
ELSE NULL
END
Using these, we can use two further LODs to update our Account Manager and Client ID fields.
[Account Manager] | { FIXED [Client] : MAX( [New Account Managers Only] ) }
[Client ID] | { FIXED [Client] : MAX( [New IDs Only] ) }
With this we've now replaced any outdated IDs or Account Managers with their current counterparts.
Before moving on, we also need to update the From Date with the date for the new information, which we can do using a calculated field that overwrites the From Date field.
[From Date] | [Most Recent Date Per Client]
Step 3 - De-duplicate the data
Finally, now that we have replaced all old Account Managers and Client IDs we just need to remove duplicate rows and extra fields. You can do this with an LOD and a filter but in this case it is simpler to use an Aggregate step and group on all the original fields.
This both de-duplicates the data and removes all the extra calculated fields we used along the way. The challenge has now been completed and the data is ready for outputting.
The full output can be downloaded here.
After you finish the challenge make sure to fill in the participation tracker, then share your solution on Twitter using #PreppinData and tagging @Datajedininja, @JennyMartinDS14 & @TomProwse1
You can also post your solution on the Tableau Forum where we have a Preppin' Data community page. Post your solutions and ask questions if you need any help!


