2024: Week 3 - Solution
Solution by Tom Prowse and you can download the workflow here.

This week we continued our analysis with the Prep Air flow card by introducing target data into our flow.
Step 1 - Input Data
First we need to input our data. This is in a few different files so we need to make sure we have connected to all three sources from the given input files.
Once we have connected we can bring the outputs from Week 1 into the workflow - this is two data sources containing information about Flow / Non-flow card holders. These can be combined into a single table by using a union step.
The flow/non-flow card input should look like this:

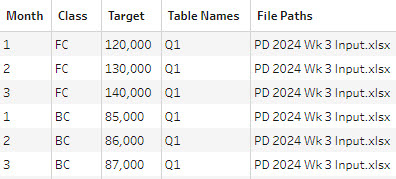
As our third input, we want to bring in the table containing the target information from Q1. As each quarter is separated into different tables, we can use the 'Union multiple tables' option in the input step to bring all of the tables in from this input.

This will union all 4 of the tables and out targets table should look like this:
Step 2 - Class
Next we can focus on the Class field within the flow/non-flow card workstream. First we can remove the Table Names field, then we want to rename the Class fields so they match the requirements. For this I have used the Group functionality but you could use an IF statement or similar.
To rename the fields you can double click on the value within the profile pane and then rename the field. Note, once you rename the fields they will combine some values so you'll need to click into the field and then rename the values from the Group.

After renaming the values, we can then split apart the first letter of each word to create the initials. As there are a maximum of two words in each we can use the following calculation:
Class Abbreviation
LEFT([Class],1)+
LEFT(SPLIT([Class],' ',2),1)
Note: This calculation only works with 1 or 2 words, this won't be dynamic if there are more words included.
After creating the abbreviation field we can then total the Price amount by Abbreviation & Month number using an aggregation step.

A nice little tip within Tableau Prep is that you can change the date format within an aggregation field by selecting the 'Group' option above a date field then selecting 'Group by level'. This saves us a step earlier in the flow as we don't need to convert the dates separately.

Step 3 - Difference to Target
The final step is to combine the two workstreams together so that we have the targets data in our main data set. To do this we can use an inner join where Date = Month and Class Abbreviation = Class.

Once joined together, we can remove any unneeded fields and then calculate the difference to target for each:
Difference to Target
[Price]-[Target]
After this calculation we are ready to output our table - which should look like this:

After you finish the challenge make sure to fill in the participation tracker, then share your solution on Twitter using #PreppinData and tagging @Datajedininja, @JennyMartinDS14 & @TomProwse1
You can also post your solution on the Tableau Forum where we have a Preppin' Data community page. Post your solutions and ask questions if you need any help!


